 |
Cheat Engine
The Official Site of Cheat Engine
|
| View previous topic :: View next topic |
| Author |
Message |
Corroder
Grandmaster Cheater Supreme
 Reputation: 75 Reputation: 75
Joined: 10 Apr 2015
Posts: 1667
|
 Posted: Tue Feb 21, 2017 10:29 pm Post subject: Scroll box and button face Posted: Tue Feb 21, 2017 10:29 pm Post subject: Scroll box and button face |
 |
|
Hi there,
1. Is there any samples how to use scroll box in CE 6.6 ?
2. Is it possible to adding picture as button face ?. Maybe something similar like we can do in VB. Instead make a 'picture box' as a button in CE.
Thanks and BR.. 
|
|
| Back to top |
|
 |
akumakuja28
Master Cheater
 Reputation: 16 Reputation: 16
Joined: 28 Jun 2015
Posts: 432
|
| Posted: Wed Feb 22, 2017 8:05 pm Post subject: |
|
|
I doubt you will find any "hand written" references to scrollbox.
createScrollBox() does not work in the Lua Engine
Idk about button image.
_________________
|
|
| Back to top |
|
|
Corroder
Grandmaster Cheater Supreme
Reputation: 75
Joined: 10 Apr 2015
Posts: 1667
|
| Posted: Wed Feb 22, 2017 8:47 pm Post subject: |
|
|
akumakuja28 : | Quote: | | createScrollBox() does not work in the Lua Engine |
Yes, that not work using lua engine (lua script), it must be arrange using form designer. And for button face I am not find other way except use panel and add image to the panel and setting for bavel to get it look like a button, but I don't know yet how to make "selection effect" according to mouse movement from one panel to other panel and then click it if want to open a process related to shown image on the panel.
Selection effect which mentioned, mean, something like, example : panel color change if cursor on there, etc and also use cursor type crHandPoint.
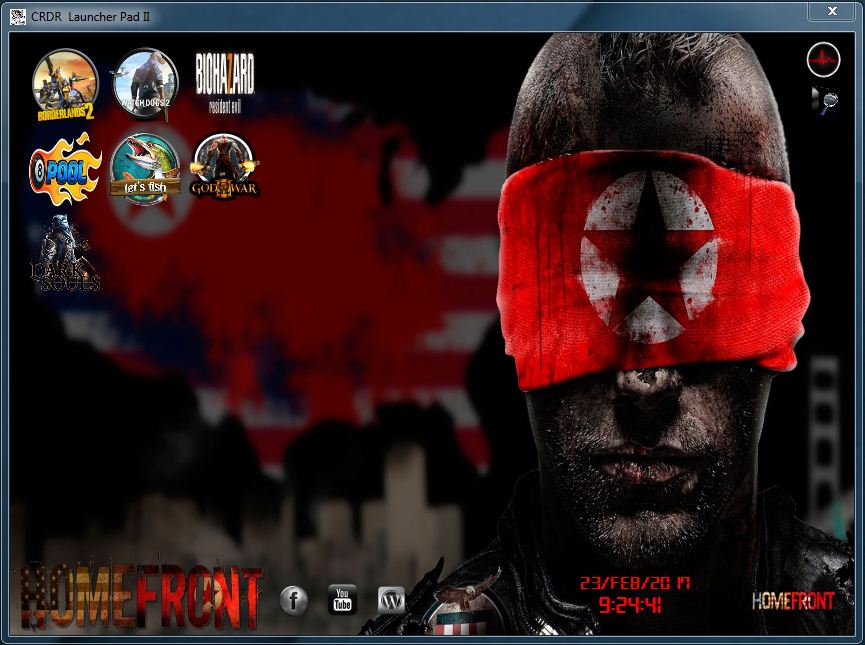
What I am trying to do is making "Menu Slider With Image", referenced by your AdvanceCE video. Something like a Game Launcher Pad, which I did already using VB Net. Now I try make it in CE like yours.
Regards
| Description: |
| My VB - Game Launcher Pad |
|
| Filesize: |
98.07 KB |
| Viewed: |
18116 Time(s) |
|
|
|
| Back to top |
|
|
akumakuja28
Master Cheater
Reputation: 16
Joined: 28 Jun 2015
Posts: 432
|
| Posted: Thu Feb 23, 2017 12:10 pm Post subject: |
|
|
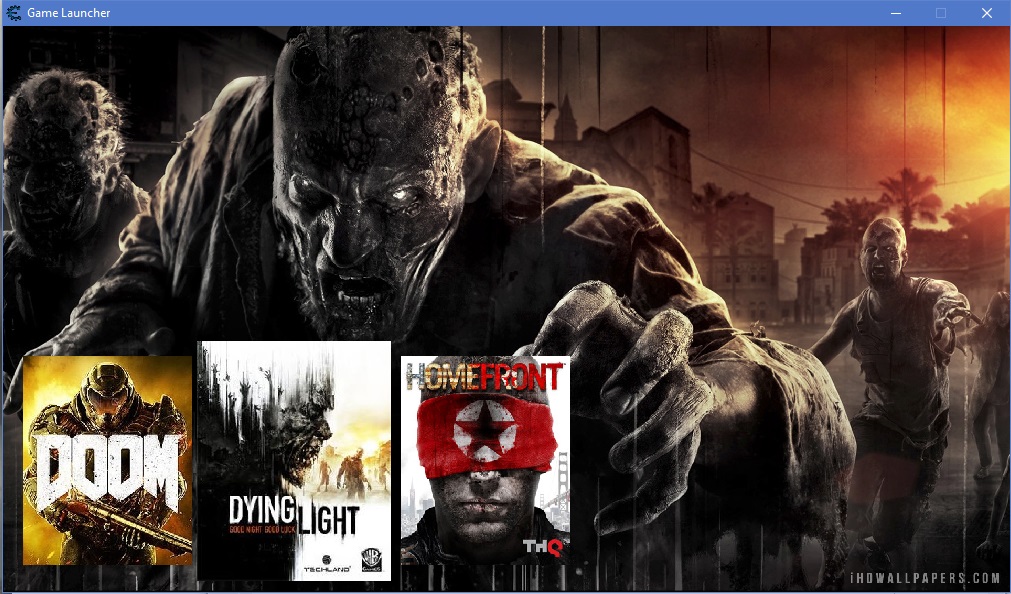
I am sorry corroder I prolly misunderstood you. So I wrote this up to explain mouse events.
Also there is an explanation of how to scroll inside the table
As far AdvancedCE's game launcher. Tht thing is alot more complicated now.
Table Download is HERE
Table was to big to Upload. Whatever
| Description: |
|
| Filesize: |
240.05 KB |
| Viewed: |
18070 Time(s) |
|
_________________
|
|
| Back to top |
|
|
Corroder
Grandmaster Cheater Supreme
Reputation: 75
Joined: 10 Apr 2015
Posts: 1667
|
| Posted: Thu Feb 23, 2017 6:19 pm Post subject: |
|
|
akumakuja28
Wow..thank so much for table. This is really I need. This (your) template for game launcher pad using CE is enough and I can learn from it also try to developing as I could.
Thank you and regards
|
|
| Back to top |
|
|
akumakuja28
Master Cheater
Reputation: 16
Joined: 28 Jun 2015
Posts: 432
|
| Posted: Thu Feb 23, 2017 7:24 pm Post subject: |
|
|
| Corroder wrote: | akumakuja28
Wow..thank so much for table. This is really I need. This (your) template for game launcher pad using CE is enough and I can learn from it also try to developing as I could.
Thank you and regards |
You saying thank you is the only reason why I take time to write examples for you. Feel free to ask questions anytime. 
_________________
|
|
| Back to top |
|
|
Corroder
Grandmaster Cheater Supreme
Reputation: 75
Joined: 10 Apr 2015
Posts: 1667
|
| Posted: Thu Feb 23, 2017 11:07 pm Post subject: |
|
|
akumakuja28
Sure, really you are very nice guy. Once again thank so much for all good kinds you did for me.

Regards
|
|
| Back to top |
|
|
DaSpamer
Grandmaster Cheater Supreme
 Reputation: 52 Reputation: 52
Joined: 13 Sep 2011
Posts: 1578
|
| Posted: Tue Feb 28, 2017 5:16 am Post subject: |
|
|
Never liked built in scrollbar component, as it's quite limited and it doesn't fit my design.
About face buttons, it's quite easy as you can hook up any mouse event.
| Code: |
onMouseDown -- hold/click
onMouseUp -- unhold/click ended
onEnter -- mouse Entering
onExit -- mouse left
|
You may hook any of these methods and call createButton with your desired style and parameters (look at the example)
Everything can be done via a single image object.
I prefer drawining UI as its simple ( using pen and brushes ) but gives modern look and less performance penality.
Here's an example for some colorful button click event, corners are rounded and simple color transition from background to button's color.
| Code: | f = createForm();
f.width = 300;
f.height = 300;
i = createImage(f);
i.Align = 'alClient'
local ic = i.Canvas
local b = ic.Brush;
ic.clear();
b.Color = 0x202020;
ic.clear();
math.rnd = function (input) if(not type(input)=='number') then return nil; end; local a = math; local b,c = a.floor(input),a.ceil(input) return (input >= b+0.5 and c or b) end;
function DiffColors(c1,c2,ratio)
if (type(c1) == 'number' and type(c2) == 'number') then
local swapped = false;
if (c1 < c2) then
c2,c1 = c1,c2;
swapped = true;
end
ratio = (tonumber(ratio) and (ratio > 1 and ratio) or 1)
local d1 = math.floor(((c1 & 0xFF0000) - (c2 & 0xFF0000)) * (ratio / 100))& 0xFF0000;
local d2 = math.floor(((c1 & 0xFF00) - (c2 & 0xFF00)) * (ratio / 100))& 0xFF00;
local d3 = math.floor(((c1 & 0xFF) - (c2 & 0xFF)) * (ratio / 100))& 0xFF;
local d4 = d1 | d2 | d3;
return (swapped and c2 + d4 or c1 - d4),true;
end
return false;
end
function pr(n)
print(("%x"):format(n))
end
function createButton(t,x,y,width,height,text,color)
x,y,width,height = x or 0, y or 0, width or 50, height or 25;
if (t and type(t) == 'userdata' and t.Brush) then
local _w,tw,_h,th
if (text and type(text) == 'string') then
local f = t.Font;
f.Height = 17;
f.Style = '[]';
tw = t.getTextWidth(text);
th = t.getTextHeight(text);
_w = math.rnd((tw + 10)/10) * 10;
_h = math.rnd((th + 4)/3) * 3;
width = (width > _w and width or _w);
height = (height > _h and height or _h);
end
local _cx,_cy = 2,2; -- corner area ...
local bgrclr = t.getPixel(x,y)
local b,p,l,sp = t.Brush,t.Pen,t.line,t.setPixel
local line,client = 0xC0B4AD,0xE4E4E4;
local aa1,aa2,aa3 = 0x7d6a5f, 0xA99284, 0x533B2B;
if (color) then
client = color;
local destc = color <= 0x7FFFFF and 0 or 0xFFFFFF;
line = DiffColors(client,destc,(destc == 0 and 26 or 55));
aa2 = DiffColors(line,bgrclr,16); -- based on background where we going to draw...
aa1 = DiffColors(line,bgrclr,29);
aa3 = DiffColors(line,bgrclr,66);
if (not(line and aa2 and aa1 and aa3)) then
error("no colors")
end;
end
ex,ey = x+width, y+height;
-- background white..ish or depends on user
b.Color = client;
t.fillRect(x,y,ex,ey) -- replace with image if you want, use draw method or copyRect
-- box boundries
p.Color = line;
p.Width = 1;
l(x+_cx,y,ex-_cx,y);l(x+_cx,ey,ex-_cx,ey);l(x,y+_cy,x,ey-_cy);l(ex,y+_cy,ex,ey-_cy);
-- line colored sqaure before corner part..
sp(x+1,y+1,line);sp(x+1,ey-1,line);sp(ex-1,y+1,line);sp(ex-1,ey-1,line);
-- round corner ...
p.Color = aa1;
l(x,y+_cy-1,x+_cx,y);sp(x,y+_cy,aa2);sp(x+_cx,y,aa2);
l(ex-_cx+1,y,ex+1,y+_cy);sp(ex-_cx,y,aa2);sp(ex,y+_cy,aa2);
l(ex-_cx+1,ey,ex+1,ey-_cy);sp(ex-_cx,ey,aa2);sp(ex,ey-_cy,aa2);
l(x,ey-_cy+1,x+_cx,ey+1);sp(x,ey-_cy,aa2);sp(x+_cx,ey,aa2);
sp(x,y,aa3);sp(x,ey,aa3);sp(ex,y,aa3);sp(ex,ey,aa3);
if (text and tw and th) then
local _wx = math.ceil((width - tw)/2);
local _hx = math.floor((height - th)/2);
b.Style = 1;
t.textOut(x+1+_wx,y+_hx,text);
end
end
end
local lastx,lasty,lastcolor
i.onMouseUp = function (sender,button,x,y)
generateFakeButton(lastx,lasty,DiffColors(lastcolor,0,40));
end
i.onMouseDown = function (sender,button,x,y)
lastcolor = generateFakeButton(x,y);
lastx,lasty = x,y;
end
local tc,sf,mr = table.concat,string.format,math.random
function generateFakeButton(x,y,color)
local _clr = color or (tc({'0x',sf("%x",mr(0,255)),sf("%x",mr(0,255)),sf("%x",mr(0,255))}))+0;
createButton(ic,x,y,75,25,"TESTING",_clr)
return _clr
end
-- local sts = getMicroTime();
-- for i=1,100 do
-- createButton(ic,10,10,150,25,"TESTING",0x123456)
-- createButton(ic,10,50,150,25,"TESTING",0x654321)
-- createButton(ic,10,90,150,25,"TESTING",0xAAEE99)
-- end
-- print("Took total time of ", getMicroTime()-sts); -- 0.059667999999988;
-- f.destroy(); |
If you wish to show a static button on an exisiting image then you have to save button's properties such as: x,y,width,height
then assign an onMouseMove event to your object/image, checking mouse cords to see if it's in buttons boundaries, based on result you can display "onHover" and such button images/effects and such.
_________________
|
|
| Back to top |
|
|
Corroder
Grandmaster Cheater Supreme
Reputation: 75
Joined: 10 Apr 2015
Posts: 1667
|
| Posted: Tue Feb 28, 2017 9:09 pm Post subject: |
|
|
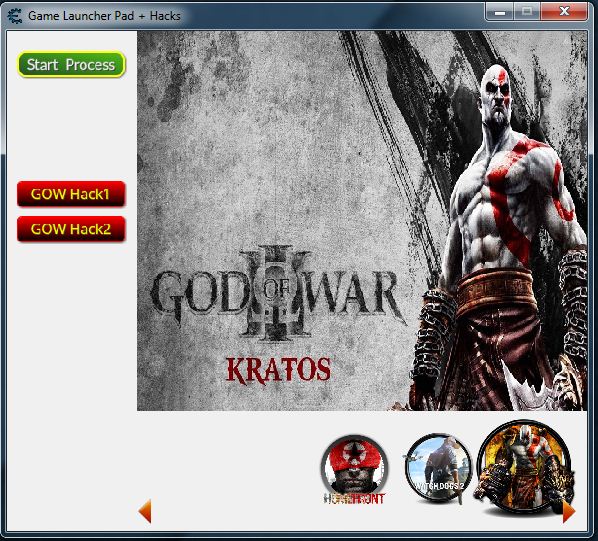
Thanks DaSpammer,
I have tested your script. I hope I can use your script for buttons face in other project in the future. Btw, I have made a game launcher pad with use some images as button and added a function for scrolling game icons image (icon slider) and this is what I need for this time. [credit to : akumakuja28].
Here is sample script, where is need adding images by own self.
| Code: | local LcWindow = createForm()
LcWindow.Height = 500
LcWindow.Width = 580
LcWindow.Caption = 'Game Launcher Pad + Hacks'
---LcWindow.Color = '0x99999999'
LcWindow.Position = 'poScreenCenter'
LcWindow.BorderStyle = 'bsSingle'
LcWindow.Name = 'LcWindow'
PnWindow = createPanel(LcWindow)
PnWindow.Left = 130
PnWindow.Height = 380
PnWindow.Width = 450
Op_Process = createImage(LcWindow)
Op_Process.Picture.loadFromStream(findTableFile('Btn_StartProcess.png').Stream)
Op_Process.Left = 10
Op_Process.Top = 20
Op_Process.Height = 28
Op_Process.Width = 110
Op_Process.Stretch = true
Op_Process.Visible = false
Btn_Hack1 = createImage(LcWindow)
Btn_Hack1.Picture.loadFromStream(findTableFile('Btn_GOW_Hack1.png').Stream)
Btn_Hack1.Left = 10
Btn_Hack1.Top = 150
Btn_Hack1.Height = 28
Btn_Hack1.Width = 110
Btn_Hack1.Stretch = true
Btn_Hack1.Visible = false
Btn_Hack2 = createImage(LcWindow)
Btn_Hack2.Picture.loadFromStream(findTableFile('Btn_GOW_Hack2.png').Stream)
Btn_Hack2.Left = 10
Btn_Hack2.Top = Btn_Hack1.Top + 35
Btn_Hack2.Height = 28
Btn_Hack2.Width = 110
Btn_Hack2.Stretch = true
Btn_Hack2.Visible = false
local BgImg = createImage(PnWindow)
BgImg.Picture.loadFromStream(findTableFile('Main.jpg').Stream)
--BgImg.Proportional = true
BgImg.Height = PnWindow.Height
BgImg.Width = PnWindow.Width
BgImg.Stretch = true
BgImg.Name = "BgImg"
local Row1 = 330
local Space = 20
local SelectionSize = 30
local BaseHeight = 210
local BaseWidth = math.floor(BaseHeight*0.80922)
-- Game Icon
local GameIcon_1 = createImage(LcWindow)
GameIcon_1.Picture.loadFromStream(findTableFile('Btn_GOW_Icon1.png').Stream)
GameIcon_1.Proportional = true
GameIcon_1.Top = LcWindow.Height - 100
GameIcon_1.Left = LcWindow.Width - 100
GameIcon_1.Height = 75
GameIcon_1.Width = 75
GameIcon_1.Stretch = true
GameIcon_1.Transparent = true
GameIcon_1.Name = "GameIcon_1"
local GameIcon_2 = createImage(LcWindow)
GameIcon_2.Picture.loadFromStream(findTableFile('Btn_WD_Icon2.png').Stream)
GameIcon_2.Proportional = true
GameIcon_2.Top = LcWindow.Height - 100
GameIcon_2.Left = GameIcon_1.Left - 85
GameIcon_2.Height = 75
GameIcon_2.Width = 75
GameIcon_2.Stretch = true
GameIcon_2.Transparent = true
GameIcon_2.Name = "GameIcon_2"
local GameIcon_3 = createImage(LcWindow)
GameIcon_3.Picture.loadFromStream(findTableFile('Btn_HF_Icon3.png').Stream)
GameIcon_3.Proportional = true
GameIcon_3.Top = LcWindow.Height - 100
GameIcon_3.Left = GameIcon_2.Left - 85
GameIcon_3.Height = 75
GameIcon_3.Width = 75
GameIcon_3.Stretch = true
GameIcon_3.Transparent = true
GameIcon_3.Name = "GameIcon_3"
-- Show Game Image Preview + Hack Buttons
local function M_Enter_GOW(sender)
sender.Height = sender.Height + SelectionSize
sender.Width = sender.Width + SelectionSize
sender.Left = sender.Left - SelectionSize/2
sender.Top = sender.Top - SelectionSize/2
BgImg.Picture.loadFromStream(findTableFile('Main_GOW.jpg').Stream)
-- UDF1.CEPanel1.Color = 0x00FFDBB7
Btn_Hack1.Picture.loadFromStream(findTableFile('Btn_GOW_Hack1.png').Stream)
Btn_Hack2.Picture.loadFromStream(findTableFile('Btn_GOW_Hack2.png').Stream)
Btn_Hack1.Visible = true
Btn_Hack2.Visible = true
Op_Process.Visible = true
end
local function M_Enter_WD(sender)
sender.Height = sender.Height + SelectionSize
sender.Width = sender.Width + SelectionSize
sender.Left = sender.Left - SelectionSize/2
sender.Top = sender.Top - SelectionSize/2
BgImg.Picture.loadFromStream(findTableFile('Main_WD.jpg').Stream)
-- UDF1.CEPanel1.Color = 0x00FFDBB7
Btn_Hack1.Picture.loadFromStream(findTableFile('Btn_WD_Hack1.png').Stream)
Btn_Hack2.Picture.loadFromStream(findTableFile('Btn_WD_Hack2.png').Stream)
Btn_Hack1.Visible = true
Btn_Hack2.Visible = true
Op_Process.Visible = true
end
local function M_Enter_HF(sender)
sender.Height = sender.Height + SelectionSize
sender.Width = sender.Width + SelectionSize
sender.Left = sender.Left - SelectionSize/2
sender.Top = sender.Top - SelectionSize/2
BgImg.Picture.loadFromStream(findTableFile('Main_HF.jpg').Stream)
-- UDF1.CEPanel1.Color = 0x00FFDBB7
Btn_Hack1.Picture.loadFromStream(findTableFile('Btn_HF_Hack1.png').Stream)
Btn_Hack2.Picture.loadFromStream(findTableFile('Btn_HF_Hack2.png').Stream)
Btn_Hack1.Visible = true
Btn_Hack2.Visible = true
Op_Process.Visible = true
end
local function M_Leave(sender)
sender.Height = sender.Height - SelectionSize
sender.Width = sender.Width - SelectionSize
sender.Left = sender.Left + SelectionSize/2
sender.Top = sender.Top + SelectionSize/2
BgImg.Picture.loadFromStream(findTableFile('Main.jpg').Stream)
Btn_Hack1.Visible = false
Btn_Hack2.Visible = false
Op_Process.Visible = false
end
local function scroll(sender)
if sender.Name == 'LeftBtnImage'
then
Speed = -10
else
Speed = 10
end
for x=1, LcWindow.getComponentCount()-1-2 do
LcWindow.Component[x].Left = LcWindow.Component[x].Left+Speed
end
end
local b = createImage(LcWindow)
b.Picture.loadFromStream(findTableFile('Btn_Left.PNG').Stream)
b.Stretch = true
b.Left = 120
b.Top = LcWindow.Height - 40
b.Width = 40
b.Height = 40
b.OnMouseDown = scroll
b.Name = 'LeftBtnImage'
local b2 = createImage(LcWindow)
b2.Picture.loadFromStream(findTableFile('Btn_right.png').Stream)
b2.Stretch = true
b2.Left = 540
b2.Top = LcWindow.Height - 40
b2.Width = 40
b2.Height = 40
b2.OnMouseDown = scroll
-- provide for hacks
function hack1()
Btn_Hack1.Visible = true
Btn_Hack2.Visible = true
Op_Process.Visible = true
-- Make new event
-- show hack controller on other form, etc
-- including attach process handler
end
-- function hack2
-- function hack3
function GameOpen1()
shellExecute("notepad.exe")
hack1()
end
function GameOpen2()
shellExecute("calc.exe")
end
function GameOpen3()
shellExecute("notepad.exe")
end
GameIcon_1.OnMouseEnter = M_Enter_GOW
GameIcon_1.OnMouseLeave = M_Leave
GameIcon_1.OnClick = GameOpen1
GameIcon_2.OnMouseEnter = M_Enter_WD
GameIcon_2.OnMouseLeave = M_Leave
GameIcon_2.OnClick = GameOpen2
GameIcon_3.OnMouseEnter = M_Enter_HF
GameIcon_3.OnMouseLeave = M_Leave
GameIcon_2.OnClick = GameOpen3
LcWindow.show() |
Regards
| Description: |
| Sample Game Launcher Pad (Tested) |
|
| Filesize: |
99.55 KB |
| Viewed: |
17682 Time(s) |
|
|
|
| Back to top |
|
|
akumakuja28
Master Cheater
Reputation: 16
Joined: 28 Jun 2015
Posts: 432
|
| Posted: Tue Feb 28, 2017 10:14 pm Post subject: |
|
|
Very cool.
1st. I wanna know how your playing GOW 3 on PC.
Second can you up the tablefile with all the Images so we can test it out.
_________________
|
|
| Back to top |
|
|
DaSpamer
Grandmaster Cheater Supreme
Reputation: 52
Joined: 13 Sep 2011
Posts: 1578
|
| Posted: Tue Feb 28, 2017 10:22 pm Post subject: |
|
|
Sure use it, that's the point ).
It's quite simple to use image in the script

replace
| Code: | | t.fillRect(x,y,ex,ey) |
with
| Code: | | t.copyRect(x,y,ex,ey,thumb.Bitmap.Canvas,0,0,thumb.Bitmap.Canvas.width,thumb.Bitmap.Canvas.height) |
Your trainer seems pretty awesome, I'd shorten the script itself (actions that you repeat should be placed inside a function), and the scroll function, I would modify to move if you hold,and to move faster the longer you hold, or replace it with a single click and use timer to fade or something.
_________________
|
|
| Back to top |
|
|
akumakuja28
Master Cheater
Reputation: 16
Joined: 28 Jun 2015
Posts: 432
|
| Posted: Tue Feb 28, 2017 10:43 pm Post subject: |
|
|
@DaSpammer.
Is there any good examples for canvas draw? I remeber spending a couple hours trying to create a gradient.
_________________
|
|
| Back to top |
|
|
DaSpamer
Grandmaster Cheater Supreme
Reputation: 52
Joined: 13 Sep 2011
Posts: 1578
|
| Posted: Tue Feb 28, 2017 10:46 pm Post subject: |
|
|
| akumakuja28 wrote: | @DaSpammer.
Is there any good examples for canvas draw? I remeber spending a couple hours trying to create a gradient. |
Start a new thread with example script or more specific information, will help you out
_________________
|
|
| Back to top |
|
|
Corroder
Grandmaster Cheater Supreme
Reputation: 75
Joined: 10 Apr 2015
Posts: 1667
|
| Posted: Wed Mar 01, 2017 12:44 am Post subject: |
|
|
akumakuja28
1. The icon games on the trainer (sample) mentioned about, it just a sample.
Btw, since 2016 I think there are already PS3 emulator (ECXPS3 emulator).
and to install GOW 3 on PC here is reference link :
https://www.youtube.com/watch?v=IT0AFseEtKU
2. Table for sample trainer too big to attach
download :
https://mega.nz/#!ugE2UZiD!Pny8kfrh2XcmncKlFAvuc24QzV0BJWH0oMrYKwdNU0A
DaSpamer
Yes we could shorten | Quote: | | (actions that you repeat should be placed inside a function) |
, example :
from akumakuja28 script
| Code: | //... create main form here
local Row1 = 330
local Space = 20
local SelectionSize = 30
local BaseHeight = 210
local BaseWidth = math.floor(BaseHeight*0.80922
local function M_Enter(sender)
sender.Height = sender.Height + SelectionSize
sender.Width = sender.Width + SelectionSize
sender.Left = sender.Left - SelectionSize/2
sender.Top = sender.Top - SelectionSize/2
-- BackgroundImage.Picture.loadFromStream(findTableFile(sender.Name..'Wall.jpg').Stream) -- As Template Image...
end
local function M_Leave(sender)
sender.Height = sender.Height - SelectionSize
sender.Width = sender.Width - SelectionSize
sender.Left = sender.Left + SelectionSize/2
sender.Top = sender.Top + SelectionSize/2
BackgroundImage.Picture.loadFromStream(findTableFile('Base.jpg').Stream)
end
local GameName = {}
local GameLoc = {}
GameName[1] = 'GOW3'
GameLoc[1] = [[ string Location of game ]]
GameName[2] = 'WD2'
GameLoc[2] = [[notepad.exe]] ---sample
GameName[3] = HF'
GameLoc[3] = [[calc.exe]]
local function OpenGame(sender)
for x = 1, #GameName do
if sender.name == GameName[x]
then
shellExecute(GameLoc[x])
end
end
end
local GameIcon = createImage(LauncherWindow) --- for GOW
GameIcon.Name = 'GOW3'
GameIcon.Height = BaseHeight
GameIcon.Width = BaseWidth
GameIcon.Picture.loadFromStream(findTableFile(GameIcon.Name..'GOW3.jpg').Stream); -- WTF
GameIcon.Proportional = true
GameIcon.Left = Space
GameIcon.Top = Row1
GameIcon.OnMouseEnter = M_Enter
GameIcon.OnMouseLeave = M_Leave
GameIcon.OnClick = OpenGame
// ... Make next game icon as reference above
|
Other problem :
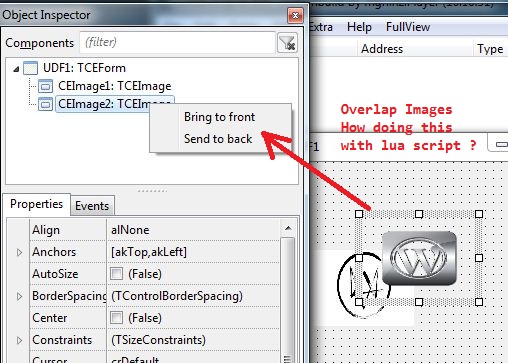
1. By using createImage() can't make overlapped images between icons, buttons overlap to main image, which we can easy do overlapped images by using form designer using send object "Send to back" or "Bring to front".
2. Need considering make new form to show hacks available and start attach process,etc when a game icon has clicked to open a game. Can't use buttons hack visible true/false according to mouse event enter/leave a game icon, because function M_Leave also make all buttons hack visible = false.
Also thanks for addition script for adding image as button face.
Edit :
DaSpammer
| Quote: | | the scroll function, I would modify to move if you hold,and to move faster the longer you hold, or replace it with a single click and use timer to fade or something |
Would you post modified script table for scroll function if you done ?. Mean while I am also try to modify it as mentioned. Thank you
| Description: |
|
| Filesize: |
91.02 KB |
| Viewed: |
17639 Time(s) |
|
|
|
| Back to top |
|
|
DaSpamer
Grandmaster Cheater Supreme
Reputation: 52
Joined: 13 Sep 2011
Posts: 1578
|
| Posted: Wed Mar 01, 2017 1:21 am Post subject: |
|
|
1. To send back or bring to front objects we probably need make a small modification to C.E, but that's a minor issue, basically remember the order that you create your objects.
For example lets say you want background, and over background you want the trainer area, create first the background image and then create the trainer area, there is no need to send back or front.
but if you really need, you can:
switch between objects (img1 = img2 and img2 = img1)
handle everything offscreen and draw your desired info on image
2. Not quite sure if understood what you meant, But I assume that you're hiding some object, therefore mouse events and such do not work?
Here's an example of how I would code an Image based button.
| Code: | f = createForm();
f.width = 300;
f.height = 300;
i = createImage(f);
i.Align = 'alClient'
local ic = i.Canvas
local b,p = ic.Brush,ic.Pen;
ic.clear();
clrs = {0xFF0000,0xFF00AF,0xFF00FF,0x00FFFF}
b.Color = clrs[3];
ic.rect(50,50,150,100)
local waspressed = false; -- flag.. Down X,Y ~= Up X,Y
i.onMouseMove = function(sender,x,y)
if (waspressed) then -- user currently holds down a mouse click
return
end
if ( ( x >= 50 and x <=150) and (y >= 50 and y <= 100)) then
if (sender.Canvas.Brush.Color ~= clrs[2]) then
sender.Canvas.Brush.Color = clrs[2]; -- purple
sender.Canvas.rect(50,50,150,100)
end
else -- we dont need to draw this rect EVERYTIME, only when there was some changes...
if (sender.Canvas.Brush.Color ~= clrs[3]) then
sender.Canvas.Brush.Color = clrs[3]; -- lite pink
sender.Canvas.rect(50,50,150,100)
end
end
end
i.onMouseDown = function(sender,button,x,y)
if ( ( x >= 50 and x <=150) and (y >= 50 and y <= 100)) then
sender.Canvas.Brush.Color = clrs[4]; -- yellllowww
sender.Canvas.rect(50,50,150,100)
waspressed = true;
end
end
i.onMouseUp = function(sender,button,x,y)
-- if user clicks on x=0,y=0 and holds the mouse
-- releases on 50 < x < 150 and 50 < y < 100, he would trigger this event
-- but if we know he pressed on button (same x,y range), we may allow him also release it
if ( waspressed and ( x >= 50 and x <=150) and (y >= 50 and y <= 100)) then
sender.Canvas.Brush.Color = clrs[1]; -- blue
sender.Canvas.rect(50,50,150,100)
waspressed = false;
end
end |
After I learnt to love bitmaps and canvases, I do eveything with these controls, rarely using any other control.
_________________
|
|
| Back to top |
|
|
|
|
You cannot post new topics in this forum
You cannot reply to topics in this forum
You cannot edit your posts in this forum
You cannot delete your posts in this forum
You cannot vote in polls in this forum
You cannot attach files in this forum
You can download files in this forum
|
|

